In considering hands-on work and haptic intelligence, both in a lab and creatively, I've been thinking about the difference between knowing something, and knowing about something. I'm concerned with knowledge generation, or as it is known in academic circles, epistemology. My thinking around epistemology is along the lines of contact, touch and working with something in a practical, hands-on way as a way of knowing something versus reading about something and thus knowing about it. I see a problematic highlighted by this distinction, and that is the problematic of certain educational approaches. In academia, far too often I think, students know about things because they read about them, but don't often know things in the sense that I'm referring to: not haptically nor experientially. A different educational model, that of the technical/community college, the lab, or the art studio, where technical skill is valued and practiced, provides an opportunity for students to know something. I call this haptic epistemology.
The difference between knowing (haptically) and knowing about can be illustrated thus: people read news or watch it on TV or read/watch it on the Internet. People learn about wars, strife, murder, mutilation, shooting sprees, etc. to know about them and what they do to bodies. But many of us do not know them because we haven't personally experienced these horrors. We do not bear the scars of flesh wounds or PTSD from the experience. I'm not advocating for knowing war, but I'm illustrating the distinction: we can't say we really know something when we haven't experienced it firsthand.
Likewise, a professor at UWA told me an anecdote recently about how he had to fail one of his students. The student failed his exam because he knew about the bodily systems he was working with as a medical student, from reading his text books. However, when it came to physically handling those same bodily systems, he didn't recognize them. He didn't know what he was holding and looking at, nor how to treat it. You see the critical difference.
Some artists have become the same. Art schools have all but been swallowed by academia, becoming mere departments in the overall academic system. I've seen far too many artists just stop making work and become enmeshed in philosophy and history of art to the extent that an art PRACTICE becomes utterly stunted and superseded by talking about art instead of actually making it. The conversation alone becomes the focus, instead of the work inspiring the conversation.
I want to give a practical example from my own experience. The recent funding I received from the Social Sciences and Humanities Research Council of Canada was based entirely on my ability to articulate in writing the philosophies and art histories supporting the work I wanted to do. I was not required to submit images of my previous or current artwork whatsoever, despite the fact that I'm working in visual art. I was not even required to address the materials I would use nor the objects that I would construct, in much detail. Materially and visually, it didn't matter. The framework for my proposal was scientific: evaluation methods and projected outcomes. Artists know that we don't really work this way. We don't necessarily work towards meeting a specifically-determined outcome but rather respond to materials and make adjustments along the way, with our final work often resulting from accidents, mistakes, and changing the approach.
This 'responding to materials' is a haptic process. It is an exploration of knowing versus a system of knowing about. Research methodologies are of two main kinds: bibliographical research (reading) and experimental (hands-on). The two can complement each other (and should), but I've demonstrated what happens when the research is top-heavy with bibliographical methodology and weak in experimental. Talking replaces doing.
As a person with a background in adult education, both formal theoretical training and (mostly) practical learning, I am a firm believer in hands-on learning, in not blathering on too much at students (the old 'open-head, pour-in-knowledge' model of the 'sage on the stage') but rather in providing students with opportunities for taking responsibility for their own learning, for doing their learning and then knowing something instead of just knowing about it.
This is an important argument to make for my current work, which engages with haptic intelligence, process and epistemology, from the perspective of generating knowledge through my own art/sci creations, as well as observing the knowledge and communication that happens in a biological system via cell culture. I'm not working alone in my projects - the agency of the biological systems to determine the direction in which they wish to grow, change shape, die and leave me with nothing is something I need to acknowledge, respect and know.
Tuesday, July 15, 2014
Wednesday, July 2, 2014
the altruism of biotechnology + aseptic requiem
 |
| Woven catgut sutures on 3D printed ABS loom, now enculturated with 3T3 cells. Loom & needle printed at Alternate Anatomies Lab with Stelarc. |
Surgeons still stitch their patients up by hand as far as I know. Skilled textile and flesh artists they are! The below diagram of minor surgical stitches is something I find fascinating, particularly the vertical mattress stitch.

Anyhow, I am doing biological weaving - something that hasn't yet been done in either the scientific or textile arts worlds, to my knowledge. Perhaps the creation of a diagram is warranted. Using suture thread of gut is perfect for my work with the cell cultures because it naturally deteriorates in about 90 days, long enough for the cells to take over the structure. The gut thread maintains its original tensile strength for approximately a week. It will be interesting to watch my weaving degrade and change as the cells work away at forming colonies on it.
3T3s are my best first test cells to use for the woven scaffolding because they grow like weeds. 3T3s are connective tissue cells. I now have five healthy flasks of 3T3s that I grew myself, after receiving a gift flask from a fellow artist-researcher here at SymbioticA, Soichiro Mihara from Japan. Soichiro afffectionately refers to us as 'cellmates' now. Soichiro has been treating his 3T3 cultures with low levels of gamma irradiation in order to disable their genetic ability to reproduce. I went with Soichiro last week to the Princess Margaret Hospital for Children, where we used the gamma irradiation tank. My purpose there was to sterilize my miniature looms and tools with very large doses of gamma irradiation (>25kGy). This was an experimental method for sterilizing my looms because I can't sterilize them by autoclaving--the 120˚C steam would warp the looms--and I can't sterilize them by UV radiation because the ABS plastic they're printed of is initially UV cured when it comes out of the printer, so futher UV radiation will deteriorate the material. Alas, what I discovered when attempting to sterilize using gamma irradiation is that the irradiation vault we had access to is set permanently to a low level of radiation and in order to irradiate my items to the level required for sterilization, they would have to be irradiated for 11.5 hours continuously. I just couldn't use the machine for that long. So, failed effort. I settled on ethanol sterilization, even though it too degrades the material that the looms are made of, but not to the extent that it will ruin them. So, it is the best option out of my available options. The absolute best method would be cold gas sterilization, but I don't have access to those facilities.
Here are some images of 3T3s from the digital microscope:

I named my first 3T3 culture after my grandmother, one of my 'cell parent' donors from my crowd funding campaign.

I've thawed and plated my osteoblasts that I received from Audrey Chan, the PhD student and researcher at the QEII Hospital, and they are healthy and happy, I'm thrilled to report. This is a pinnacle moment, as just last week I euthanized every miserable, dying and otherwise useless cell culture I had in the incubator. This includes the historical SymbioticA pig wings cells, proving that a moment in history cannot be brought back to life. Essentially, I started from scratch again last week, with 3T3s as my saving grace. I was extremely nervous thawing the osteoblasts, because they are my last shot at being able to grow bone while I'm here--my last access to bone cells, really, since my primary sourcing directly from bone did not pan out in the end. Anyway, my osteoblasts are thriving in regular D-10 media, with a new batch of bone soup on the front burner (not literally but the metaphor is nice).
When euthanizing my last batch of cultures, I took a moment--the 30 seconds or so that it takes for the bleach to do it's killing job--to thank the cultures for all they had taught me in the last two months. And then, I wrote a new lab protocol for 'Aseptic Requiem for Cell Cultures'. The protocol is below:

The requiem (or service) for cell cultures is appropriately brief and timed and convenient with the rest of process. This is done purposely to highlight the level of emotional distance or complete lack of sentimentality when dealing with life in a laboratory environment. The idea of an aseptic requiem is ludicrous. I'm also toying with that false dichotomy between science and religion by calling it a requiem, which is essentially a Catholic mass for the dead. Anyway, I did say a nondenominational prayer of thanks to my cell cultures before disposing of them because for me, acknowledging and reflecting on the life that I'm working with is important for maintaining my sense of humanity.
I also thawed my extra C2C12s that I had initially grown and they are doing their thing in their flasks. The previous flasks of C2C12s I had essentially starved to death because I had been feeding them differentiation medium, which is only 2% fetal calf serum versus the 20% they thrive on. Differentiation medium turns the C2C12s from single nuclei cells into myotubes, or joined together, multiple-nuclei cells. I probably should have been feeding them regular media (10%) after they differentiated but Ionat was traveling abroad for three weeks and I had no guide. Interestingly enough, Ionat just returned from the Viconti lab in Boston, Mass. and learned a new protocol that is similar to my project with using silk (only it's not woven). My silk is now a beautiful milk chocolate brown after dyeing it with my sterile-filtered, autoclaved eucalyptus bark dye. Not only is it beautiful, but it is now slightly antibacterial from the eucalyptus, which can only be a good thing in a cell culture.

One last consideration--something I've pondered in the last few days: the donors who became 'cell parents' during my crowd funding campaign are by extension, 'cell donors' even though the cells have not come from their own bodies. They are surrogate cell donors, of C2C12s, 3T3s and now mouse osteoblasts. I will attempt to grow new embodiments from this disembodied life. The altruism is manifold. What about altruism in science?
In watching a documentary about Ayn Rand and her (I think, sociopathic and reactionary against communism) philosophy centred on Individualism, as well as its link to the development of technology, the crash of the financial world, and essentially the general degradation of society one might argue, I think there is a place in the world for altruism, and perhaps in biotechnology. More to unravel for next time.
Monday, June 16, 2014
material feminisms + tiny tools
Reading right now:
Alaima, Stacy and Susan Hekman, eds. Material Feminisms. Bloomington & Indianapolis: Indiana University Press. 2008.
To quote, "Focusing exclusively on representations, ideology, and discourse [of the body] excludes lived experience, corporeal practice, and biological substance from consideration. It makes it nearly impossible for feminism to engage with medicine or science in innovative, productive or affirmative ways--the only path available is the well-worn path of critique." (p4)
So far here, we're talking about the way in which feminism has wedged the body from itself through an exclusive focus on discourse and language about the body. It's as if a distance has resulted from the production of a narrative around the thing that ignores its thing-ness, and instead turns it into a cerebral product. Feminist materialism aims to fix this dilemma.
I do situate the work that I'm doing here at SymbioticA as feminist materialist work. I'm bringing decorative craft (weaving, etc) to the pitre dish, in the lab. My research is guided by both a hypothesis: that different textile structures can affect the structural integrity of organic bone growth, as well as guided by aesthetics--the aesthetics of science with all its sterility, labware and microscopy, as well as the aesthetics of the domestic, with all its beautifying, messiness and labour/physicality. Laboriously weaving a cozy cloth on a miniature loom and immersing it in a pink nutrient liquid in an incubator, handcrafting natural dyestuffs in the kitchen and bringing them into the lab for experimentation with tissue growth, working traditional textile materials such as silk yarn into laboratory practice for not only its profound scientific implications but also for its traditional, cultural aesthetic associations with femininity, finery and rarity--these are all my methods for integrating science into a feminist-oriented, textile-based art practice and vice versa. Ultimately, it is all about crafting the body or a disembodied, abstracted part of it, in the most physical way possible. It is entirely feasible that I could implant one of my woven bone structures into my own body and have it fuse with my skeleton. We would only see it through x-rays. That is perhaps a final stage manifestation of this project. Anyway, I haven't even touched yet on the idea of enacting pseudo-motherhood in the lab, as I foster orphan cell children, keep them warm and feed and watch them grow, speculate on their behavior and attempt to influence them and what they'll become.
I'm not the very first to merge biology and domesticity/textile craft. One artist I reference quite often is Dr Catherine Fargher. She's blended storytelling, biological practice and performance into artistic pieces that bring the realm of the domestic to the lab, and then to the gallery or playhouse. I believe she coined the term 'mutated narrative', which I like to use often. Her paper, Evolution,
Mutation and Hybridity in Bio-Performance Practice: Wet Biology and
Hybrid Arts in the Performance/ Installation BioHome—The Chromosome
Knitting Project was a definitive text for my preparatory work last semester.
Today I dyed a sterile silk skein (a very small one) with sterile-filtered eucalyptus bark dye concentrate. The dye was filtered directly into a pitre dish, using tiny syringe filters under the flow hood, and the silk added. The silk was extremely resistant to liquid, having been steamed at 120˚C in the autoclave. However, eventually the dye did saturate the yarn after I poked at it for a while with lab tweezers. Then into the incubator it went for two hours. I couldn't add mordant to the dye because ultimately, I want cells to live and grow on this yarn and a mordant is the same as a fixative for cells - it kills them. The dye, however, I think will be extremely helpful in the cell cultures as I learned today that eucalyptus has antibacterial properties, meaning it will help my cell cultures from becoming contaminated. This could be a medical breakthrough! Ha, we will see what happens.
What I unfortunately discovered in this process, is that the autoclave temperatures are too much for the silk. It broke down the fibres by creating 'hot spots' on the yarn, which I only discovered after I applied the eucalyptus dye (the hot spots showed up darker than the rest of the yarn). After the yarn was dry, I tested its strength and it just simply pulled apart. Not useful for weaving. So, back to square one. I'll make new skeins, scour them in sodium carbonate again and sterilize them by other means - with ethanol perhaps. Autoclave is out.
I also dyed some decellularized hog gut, which shriveled and puckered in the pitre dish because of the tannins in the dye, creating a natural tie-dye effect on the tissue. It took the dye quite hungrily, sucking up the colour and hanging onto it. I'll spread that tissue onto glass slides and have a look under the microscope to see what effect it had on a cellular level. If there are still cells left on my decellularized tissue, it should show them up, or show something up.
My bone soup is growing crystals again, which means there is a problem somewhere, either with the pH of the media or with the incubator. I'll have to figure this out before I go ahead and thaw my mouse osteoblasts, because I don't want to kill these cells - they're pretty much my last hope for successful bone growth. All of my other cell cultures died because of the disaster with the warm water bath becoming a hot tub and cooking my media. Ooooof, that's a month and a half of work totally down the drain, and my beautiful Saint-Henry-the-cat-who-got-me-the-rat cells are a story that turned to its last page. However, this is how it is working with life materials. Unpredictable! I have a few C2C12s left, but they're struggling. Tomorrow I also get my 3T3 cell cultures to play with, and I need some good media for those. So, tomorrow will be about making more soup. This time, I really have to get it right. I could also try some more primary sourcing, but that would mean going to an abattoir to get FRESH dead bodies. I might also be able to get something from the morgue.
Also, today I met Sruli Recht, an artist who was visiting from Iceland and who is considering coming to do a residency at SymbioticA. You can check out his work here: http://srulirecht.com - one of the things he's done is to make a band ring from his own flesh, taking the skin from his stomach. He showed me where the chunk of flesh was taken from on his body today. The image of the flesh ring he designed is here: http://srulirecht.com/228259/2558967/all-things/forget-me-knot. I told Sruli that I was thinking of a residency in Iceland next and he told me he would have some contacts.
Alaima, Stacy and Susan Hekman, eds. Material Feminisms. Bloomington & Indianapolis: Indiana University Press. 2008.
To quote, "Focusing exclusively on representations, ideology, and discourse [of the body] excludes lived experience, corporeal practice, and biological substance from consideration. It makes it nearly impossible for feminism to engage with medicine or science in innovative, productive or affirmative ways--the only path available is the well-worn path of critique." (p4)
So far here, we're talking about the way in which feminism has wedged the body from itself through an exclusive focus on discourse and language about the body. It's as if a distance has resulted from the production of a narrative around the thing that ignores its thing-ness, and instead turns it into a cerebral product. Feminist materialism aims to fix this dilemma.
 |
| My miniature looms and weaving tools printed on Stelarc's 3D printer. |
I do situate the work that I'm doing here at SymbioticA as feminist materialist work. I'm bringing decorative craft (weaving, etc) to the pitre dish, in the lab. My research is guided by both a hypothesis: that different textile structures can affect the structural integrity of organic bone growth, as well as guided by aesthetics--the aesthetics of science with all its sterility, labware and microscopy, as well as the aesthetics of the domestic, with all its beautifying, messiness and labour/physicality. Laboriously weaving a cozy cloth on a miniature loom and immersing it in a pink nutrient liquid in an incubator, handcrafting natural dyestuffs in the kitchen and bringing them into the lab for experimentation with tissue growth, working traditional textile materials such as silk yarn into laboratory practice for not only its profound scientific implications but also for its traditional, cultural aesthetic associations with femininity, finery and rarity--these are all my methods for integrating science into a feminist-oriented, textile-based art practice and vice versa. Ultimately, it is all about crafting the body or a disembodied, abstracted part of it, in the most physical way possible. It is entirely feasible that I could implant one of my woven bone structures into my own body and have it fuse with my skeleton. We would only see it through x-rays. That is perhaps a final stage manifestation of this project. Anyway, I haven't even touched yet on the idea of enacting pseudo-motherhood in the lab, as I foster orphan cell children, keep them warm and feed and watch them grow, speculate on their behavior and attempt to influence them and what they'll become.
 |
| The smallest crochet hook you'll ever see. Printed on Stelarc's 3D printer. |
 |
| You can see darker areas on the yarn where it pulled apart. |
What I unfortunately discovered in this process, is that the autoclave temperatures are too much for the silk. It broke down the fibres by creating 'hot spots' on the yarn, which I only discovered after I applied the eucalyptus dye (the hot spots showed up darker than the rest of the yarn). After the yarn was dry, I tested its strength and it just simply pulled apart. Not useful for weaving. So, back to square one. I'll make new skeins, scour them in sodium carbonate again and sterilize them by other means - with ethanol perhaps. Autoclave is out.
I also dyed some decellularized hog gut, which shriveled and puckered in the pitre dish because of the tannins in the dye, creating a natural tie-dye effect on the tissue. It took the dye quite hungrily, sucking up the colour and hanging onto it. I'll spread that tissue onto glass slides and have a look under the microscope to see what effect it had on a cellular level. If there are still cells left on my decellularized tissue, it should show them up, or show something up.
My bone soup is growing crystals again, which means there is a problem somewhere, either with the pH of the media or with the incubator. I'll have to figure this out before I go ahead and thaw my mouse osteoblasts, because I don't want to kill these cells - they're pretty much my last hope for successful bone growth. All of my other cell cultures died because of the disaster with the warm water bath becoming a hot tub and cooking my media. Ooooof, that's a month and a half of work totally down the drain, and my beautiful Saint-Henry-the-cat-who-got-me-the-rat cells are a story that turned to its last page. However, this is how it is working with life materials. Unpredictable! I have a few C2C12s left, but they're struggling. Tomorrow I also get my 3T3 cell cultures to play with, and I need some good media for those. So, tomorrow will be about making more soup. This time, I really have to get it right. I could also try some more primary sourcing, but that would mean going to an abattoir to get FRESH dead bodies. I might also be able to get something from the morgue.
Also, today I met Sruli Recht, an artist who was visiting from Iceland and who is considering coming to do a residency at SymbioticA. You can check out his work here: http://srulirecht.com - one of the things he's done is to make a band ring from his own flesh, taking the skin from his stomach. He showed me where the chunk of flesh was taken from on his body today. The image of the flesh ring he designed is here: http://srulirecht.com/228259/2558967/all-things/forget-me-knot. I told Sruli that I was thinking of a residency in Iceland next and he told me he would have some contacts.
Wednesday, June 11, 2014
joining history + denatured soup
My rat bone cells have been growing, one at a time, slowly, slowly. Here are some new images from the digital microscope last week:


Little beauties. I'm just in love with them.
Here are some of Paloma's sketches for what she's thinking about with animating the cells. I think she's got sea life on the brain, too.
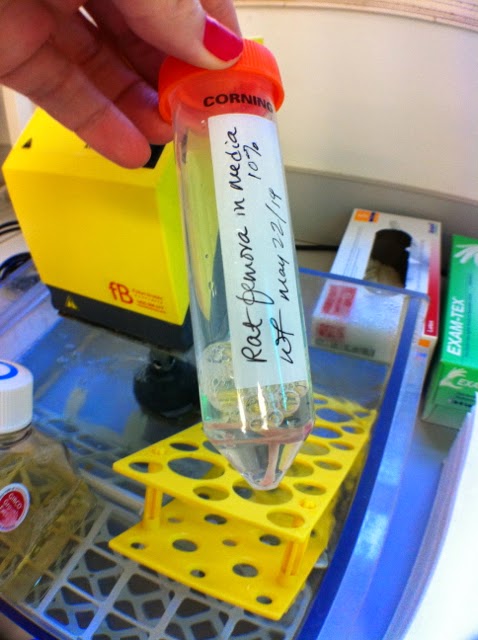
Last week I picked up a cryovial of frozen mouse osteoblast cells from PhD student, Audrey Chan at the QEII Medical Centre, School of Surgery, Centre for Orthopaedic Research, UWA. It was an amazing experience, because Audrey took the time to sit down with me and explain her process of primary sourcing bone cells from rodent femora (long bones). I will thaw the cells this week.
Also, I recently thawed some very special cells - the last cryovial of pig osteoblasts, from a project that Oron Catts did 13 years ago, called Pig Wings. So, the cells I thawed and plated (meaning put them in cell media in pitre dishes) were in a deep -80˚ sleep for the last decade and a half, almost.
Once I've successfully cultured these two types of osteoblasts, I will use some for my project and then I will also freeze some down, so that future SymbioticA projects can use them. There is something awe-inspiring about being a part of the continuation of life in this way - it almost makes me like family. I threw out almost all of my first attempts at culturing bone cells from a primary source (from the cow bones I got at the butcher) because nothing was left living in the dishes. So, now I'm down to about 25 culture dishes that I'm maintaining. I had a lab disaster last night that has threatened all of my cultures now, but I'll talk about that in a minute.
I picked up my 3D printed miniature looms yesterday from Stelarc's lab, and it was a delight to see them come out of the wax! Some of the models failed while others turned out perfectly. The problem with the failed objects is that when I scaled them down from human size to cell culture size, the proportions made the objects too thin in areas and they just didn't hold up. Important lesson in designing for 3D printing. I haven't taken any photos of the miniature looms and weaving tools yet because I still need to clean the remainder of the wax support off of them. I haven't quite figured out the best way to do that, but I'll try 100% ethanol.
I've been developing my own protocols as I go along in all these experiments, and now have a binder stacked with protocols for everything from preparing silk for tissue culturing to preparing eucalyptus for dyeing tissue to feeding cells to microscopy, etc - I've got about 20 lab protocols now, a blend of science and textile methods. Today I boiled little silk skeins in a 2000ml flask in ultrapure H2O and sodium carbonate. I boiled them in fresh solution twice to remove all of the sericin and industrial chemical residue. The first water, after boiling for 2 hours was quite cloudy and yellowed, and the second one was a bit cleaner. Then I dried them overnight in a laminar flow hood (sterile conditions), and they are now double-bagged and sealed in autoclave bags to be autoclaved in 120˚C steam, to make them completely sterile for working with, in the lab.
I realized while doing this work that labware is so perfect for working with fibre. Heat resistant glass beakers and flasks are amazing for cooking fibre in liquid, and a magnetic stirrer and hot plate does most of the work. Also, they are marked with measurements - very convenient. The highest setting on the hot plate brings liquids to a perfect, gentle, low boil and maintains it, so you can walk away and leave it. I'm really surprised more textile dye labs are not set up with scientific labware, they're such well designed utilitarian objects, which look cool, too. Easy to clean, stain resistant and durable (pretty smash-proof). I know what I'll have in my studio when I set up a permanent one again, post-grad school.
So, the disaster that happened last night was a cause of great anxiety, and a whole lot of work today. It was a result of working in a shared lab space: someone (I don't know who) turned the warm water bath up to 70˚C and left it like that. The warm water bath is supposed to be set at body temperature (37˚C) for warming up cell culture media to use in your culture dishes, to feed your cells. I went into the lab and set up everything I needed to feed my cells at the end of the day yesterday. I put three different flasks of various cell media in the warm water bath, turned it on and left the lab for 20 minutes while the UV light sterilized the flow hood. When I came back, I discovered the warm water bath steaming like a hot tub and all of my media cooking in it, nearly bursting its plastic flasks and popping the lids off them. It was a big WHAT THE FUCK?? moment. Basically, my media was ruined, the proteins in it all denatured (which means cooked and no longer fresh and usable by cells, basically). I had no choice but to feed the denatured media to my cultures, since they were starving, and deal with the fallout today.
Most of my day today consisted of running around gathering the chemicals to make new bone soup and regular D-10 (the standard cell medium). The majority of my C2C12s died. There are some left, but it'll be a long road to recovery now that they're sitting back in the right medium. I couldn't even bear to look at the marrow cells yet. I'll inspect those later under the digital microscope to be sure of what I'm looking at. Pray with me to Saint Henry, for survivors. Making bone soup completely on my own was nerve-wracking but I managed to do it, with a little help from Stuart. I love that man. Oron was home with his sick daughter and Ionat is out of the country, so I was really on my own with all of this. Once again, I had a chance to empower myself by getting tough work done in the lab using my own wits and whatever resources I could find. So, I have new bone soup, a whole fresh batch. Thankfully I still have one vial of frozen cells to make use of!
 |
| This is possibly a cell dividing. |
Little beauties. I'm just in love with them.
Here are some of Paloma's sketches for what she's thinking about with animating the cells. I think she's got sea life on the brain, too.
 |
| Paloma Dawkins. |
 |
| Paloma Dawkins. |
Last week I picked up a cryovial of frozen mouse osteoblast cells from PhD student, Audrey Chan at the QEII Medical Centre, School of Surgery, Centre for Orthopaedic Research, UWA. It was an amazing experience, because Audrey took the time to sit down with me and explain her process of primary sourcing bone cells from rodent femora (long bones). I will thaw the cells this week.
Also, I recently thawed some very special cells - the last cryovial of pig osteoblasts, from a project that Oron Catts did 13 years ago, called Pig Wings. So, the cells I thawed and plated (meaning put them in cell media in pitre dishes) were in a deep -80˚ sleep for the last decade and a half, almost.
Once I've successfully cultured these two types of osteoblasts, I will use some for my project and then I will also freeze some down, so that future SymbioticA projects can use them. There is something awe-inspiring about being a part of the continuation of life in this way - it almost makes me like family. I threw out almost all of my first attempts at culturing bone cells from a primary source (from the cow bones I got at the butcher) because nothing was left living in the dishes. So, now I'm down to about 25 culture dishes that I'm maintaining. I had a lab disaster last night that has threatened all of my cultures now, but I'll talk about that in a minute.
I picked up my 3D printed miniature looms yesterday from Stelarc's lab, and it was a delight to see them come out of the wax! Some of the models failed while others turned out perfectly. The problem with the failed objects is that when I scaled them down from human size to cell culture size, the proportions made the objects too thin in areas and they just didn't hold up. Important lesson in designing for 3D printing. I haven't taken any photos of the miniature looms and weaving tools yet because I still need to clean the remainder of the wax support off of them. I haven't quite figured out the best way to do that, but I'll try 100% ethanol.
I've been developing my own protocols as I go along in all these experiments, and now have a binder stacked with protocols for everything from preparing silk for tissue culturing to preparing eucalyptus for dyeing tissue to feeding cells to microscopy, etc - I've got about 20 lab protocols now, a blend of science and textile methods. Today I boiled little silk skeins in a 2000ml flask in ultrapure H2O and sodium carbonate. I boiled them in fresh solution twice to remove all of the sericin and industrial chemical residue. The first water, after boiling for 2 hours was quite cloudy and yellowed, and the second one was a bit cleaner. Then I dried them overnight in a laminar flow hood (sterile conditions), and they are now double-bagged and sealed in autoclave bags to be autoclaved in 120˚C steam, to make them completely sterile for working with, in the lab.
 |
| Filtering eucalyptus dyes. Mucky business. |
.JPG) |
| Filtering eucalyptus dyes in the lab. |
I realized while doing this work that labware is so perfect for working with fibre. Heat resistant glass beakers and flasks are amazing for cooking fibre in liquid, and a magnetic stirrer and hot plate does most of the work. Also, they are marked with measurements - very convenient. The highest setting on the hot plate brings liquids to a perfect, gentle, low boil and maintains it, so you can walk away and leave it. I'm really surprised more textile dye labs are not set up with scientific labware, they're such well designed utilitarian objects, which look cool, too. Easy to clean, stain resistant and durable (pretty smash-proof). I know what I'll have in my studio when I set up a permanent one again, post-grad school.
So, the disaster that happened last night was a cause of great anxiety, and a whole lot of work today. It was a result of working in a shared lab space: someone (I don't know who) turned the warm water bath up to 70˚C and left it like that. The warm water bath is supposed to be set at body temperature (37˚C) for warming up cell culture media to use in your culture dishes, to feed your cells. I went into the lab and set up everything I needed to feed my cells at the end of the day yesterday. I put three different flasks of various cell media in the warm water bath, turned it on and left the lab for 20 minutes while the UV light sterilized the flow hood. When I came back, I discovered the warm water bath steaming like a hot tub and all of my media cooking in it, nearly bursting its plastic flasks and popping the lids off them. It was a big WHAT THE FUCK?? moment. Basically, my media was ruined, the proteins in it all denatured (which means cooked and no longer fresh and usable by cells, basically). I had no choice but to feed the denatured media to my cultures, since they were starving, and deal with the fallout today.
Most of my day today consisted of running around gathering the chemicals to make new bone soup and regular D-10 (the standard cell medium). The majority of my C2C12s died. There are some left, but it'll be a long road to recovery now that they're sitting back in the right medium. I couldn't even bear to look at the marrow cells yet. I'll inspect those later under the digital microscope to be sure of what I'm looking at. Pray with me to Saint Henry, for survivors. Making bone soup completely on my own was nerve-wracking but I managed to do it, with a little help from Stuart. I love that man. Oron was home with his sick daughter and Ionat is out of the country, so I was really on my own with all of this. Once again, I had a chance to empower myself by getting tough work done in the lab using my own wits and whatever resources I could find. So, I have new bone soup, a whole fresh batch. Thankfully I still have one vial of frozen cells to make use of!
.JPG) |
| Boxes full of cryovials of cells, being brought up from liquid nitrogen. |
Wednesday, June 4, 2014
Since my last post, amazing things have happened.
I've been awarded a very generous international artist-in-residence grant from artsnb (the New Brunswick Arts Board). This enabled me to close my crowd funding campaign, because my budget is now at exactly the amount it ideally needed to be for this project. Previous to this, I was coasting on the absolute bare minimum that I needed to be here. What a relief it was to receive word that I was selected for this grant! The New Brunswick Arts Board has been absolutely phenomenal in supporting my art career over the past 13 years, just when I need support the most. We New Brunswick artists are very lucky to have this resource. The things I will be able to do now at SymbioticA will be quite extraordinary.
More good news, too - I have a bone cell! :

This, my friends, is my very first viable bone cell!
ISN'T IT BEAUTIFUL? It looks sort of like a hummingbird. This is from the rat bone marrow that I extracted from the rat that Henry the cat caught for me. Henry, my hero. The cell is the splatted thing on the left. The ghostly-looking splat stuff is the cell's cytoplasm, which has spread out and adhered itself to the bottom of the pitre dish, meaning that this cell is healthy and growing. The luminous thing on the bottom right with the tentacles is likely another cell as well, but it's unclear how healthy it is because only the nucleus is visible and no cytoplasm. So, it may be dying... or maybe it will grow. I'll know in a few days. If you look back to the splat, you can see a similarly sized nucleus in it, a white roundish thing that is underneath another layer of cell stuff. The long tendrils that reach out into the nothingness are the cell's way of networking with other cells, and when they join, the begin to form a colony, which is what I want. It was a joyous day the day I discovered this cell under the microscope! Just imagine me, like a space explorer, searching the empty universe for life, day after day, to one day stumble across this! No small accomplishment, let me tell you. Primary sourcing cells from recently dead tissue is very, very difficult. My other cell cultures are doing nothing and will just have to be thrown out. I've been struggling to work with this technique because I discovered that ordering cell lines from a supplier is much more expensive than I first imagined: the cell lines themselves are around $500-$700, but with the shipping, it's a total expense of about $2000. $2000 for a bunch of frozen cells in a miniscule vial, shipped in a box kept at -80˚. If it continues to grow and multiply, I will eventually be able to spin down and freeze my own vial of osteoblasts, and save them for later or allow someone else at SymbioticA in the future to use them, contributing to the ongoing research there. When I looked at this cell today with my naked eye through the microscope, it was glowing and radiant. A stunning, inspiring communion with the force of life, through just a single cell.
Other exciting things I've been doing include 3D printing miniature looms on Stelarc's amazing, fancy 16micron 3D printer. Stelarc needs no introduction, as far as I'm concerned but just in case: He's the artist who has an ear implanted in his arm, and it's been there since about 2006 or so. He's internationally famous in the BioArt world. He's an amazing, generous man, and is a professor at Curtin University in Perth. He's been teaching me how to use his extremely sophisticated (best in the world) 3D printer so that I can use it to print objects for my bone project.
So, I'm printing looms for weaving. Each loom is approximately 3cm x 3cm, and I've printed some miniature loom tools as well, like shuttles and needles. The looms so far are different models of simple frame and peg looms, which will allow me to weave basic cloths. I will get more elaborate with printing and assembling looms after I experiment with these ones, perhaps even print a full floor loom model in miniature and assemble it. Why the miniature looms?
My newest research has led me to discover that silk fibre is not only compatible with human biological systems (meaning the body and cells like it, it will break down in the body over time and it's even been used successfully in bone grafts already), but it also carries "indicators" that communicate with bone cells about how to differentiate, meaning it basically has programming for bone cells on each silk filament. What this means is that you don't have to use a special differentiation medium, like bone soup, to grow osteoblasts. The silk will tell them what to do, so you can grow osteoblasts in regular old cell medium. If this isn't the most radical and incredible thing ever, I don't know what is. Mind = blown. I ordered unspun silk filament thread and will weave some into miniature cloths and then will insert the entire loom with the cloth still on it into a pitre dish and culture cells on it. Imagine how amazing this will be! I'm also going to weave some of my decellularized intestine on it, as well as surgical sutures (which, by the way, are either made out of SILK or GUT). I have ample sutures waiting to be used, and will begin prepping my silk yarns tomorrow. I pick up my printed looms from Stelarc on Friday and then start weaving. I also printed some already woven structures, like a woven ball and a basket weave, to try them out in culture dishes as well, to see what happens. I'm not sure if cells will grow on that kind of polymer or not, because it's not organic (so probably not). Ultimately, I'm hoping not, because I want my cells to just grow in the shape of the cloths I weave, not the looms. I will post pics of my miniature looms once I have them. Here are some of the things that Stelarc has printed as experiments for himself:
I was also amazed and delighted to discover that preparing silk for a cell culture is exactly the same as prepping it for dyeing: washing in boiling water with soda ash for 1 hour, 2x. The only difference is that I'll dry the silk in a fume hood that's turned on overnight and autoclave it (cook it in extremely high temperature steam) to kill absolutely everything that might possibly contaminate it. Tonight, I am making my own soda ash (or sodium carbonate). I discovered that you can do this by simply putting baking soda (sodium bicarbonate) in the oven at 200˚C for 1 hour. Ta-dah, you have soda ash. It's just fantastic how much of my tissue engineering work is a combination of science, kitchen witchery and textile know-how. This particular aspect of things thrills me.
Speaking of dyeing, I've been playing with my eucalyptus bark dye, prepared as an histological stain for tissue sections on glass slides. I also dyed a shirt with it. It stained the tissue on the microscopic slides exactly the same as the cotton shirt, but interestingly enough, I didn't have to use a mordant on the shirt to get it to hold the dye, whereas I did have to add a mordant in the lab to get it to properly dye the bone and other tissue sections on the slides. Bone seems particularly hard to dye. There are plenty of mordants in the lab, as well as oxidizers which help catalyze the dye. I used sodium iodate to oxidize the eucalyptus, as well as iron as a mordant. It worked well. However, the dye liquor was not really as saturated as it could have been and so everything I used it on turned a light coffee colour. I'd like it darker, so I'll boil down the liquor more and saturate the dye/stain.
I've also learned more about the mixing and uses of histological stains, such as haematoxylin, which is a natural stain derived from the heart of haematoxylin wood. Haematoxylin stains the nuclei of cells black. Other stains (both natural and chemical) will stain different types of tissue, such as collagen. So, I've experimented with a number of these and now have a beautiful box of glass slides of tissues that I've sliced, dyed and mounted myself. They are treasures. Again, I will post more photos of those later when I have some. What I discovered about the eucalyptus dye was that it didn't discriminate between tissue types - it just dyed everything a coffee brown. I was hoping to make some great eucalyptus lab discovery, but alas...
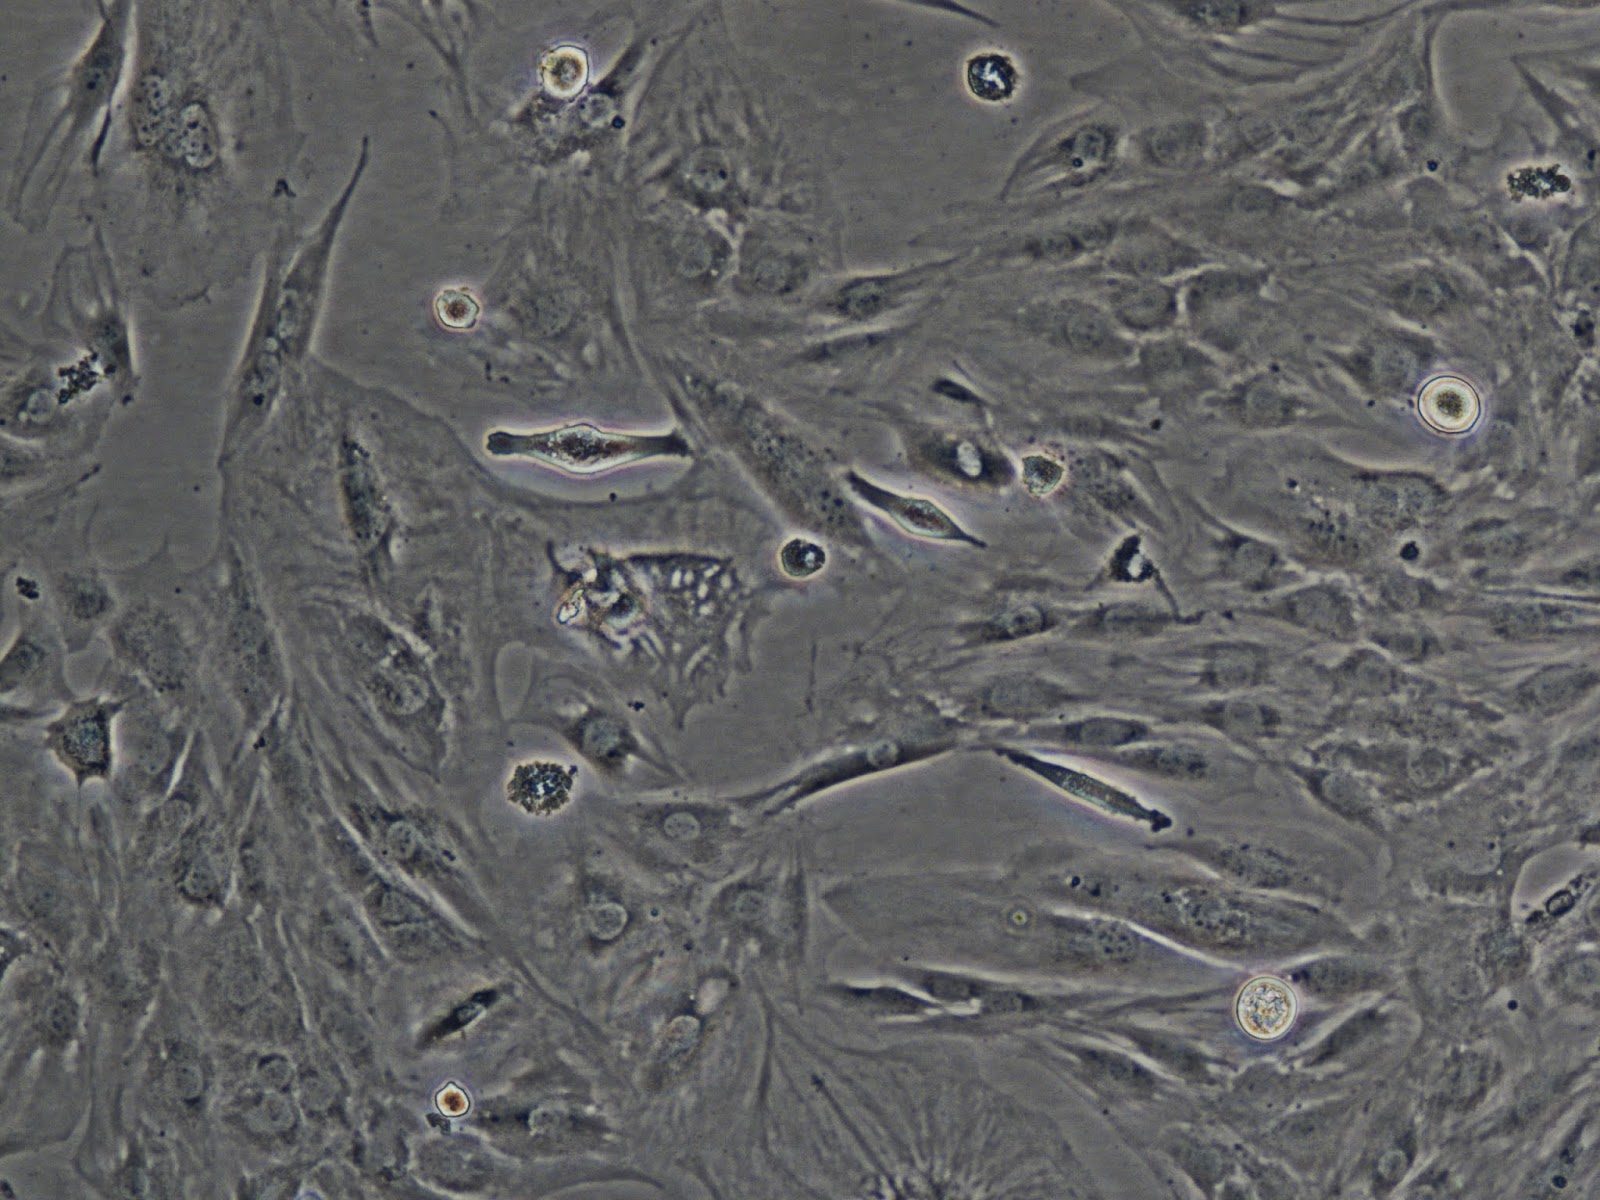
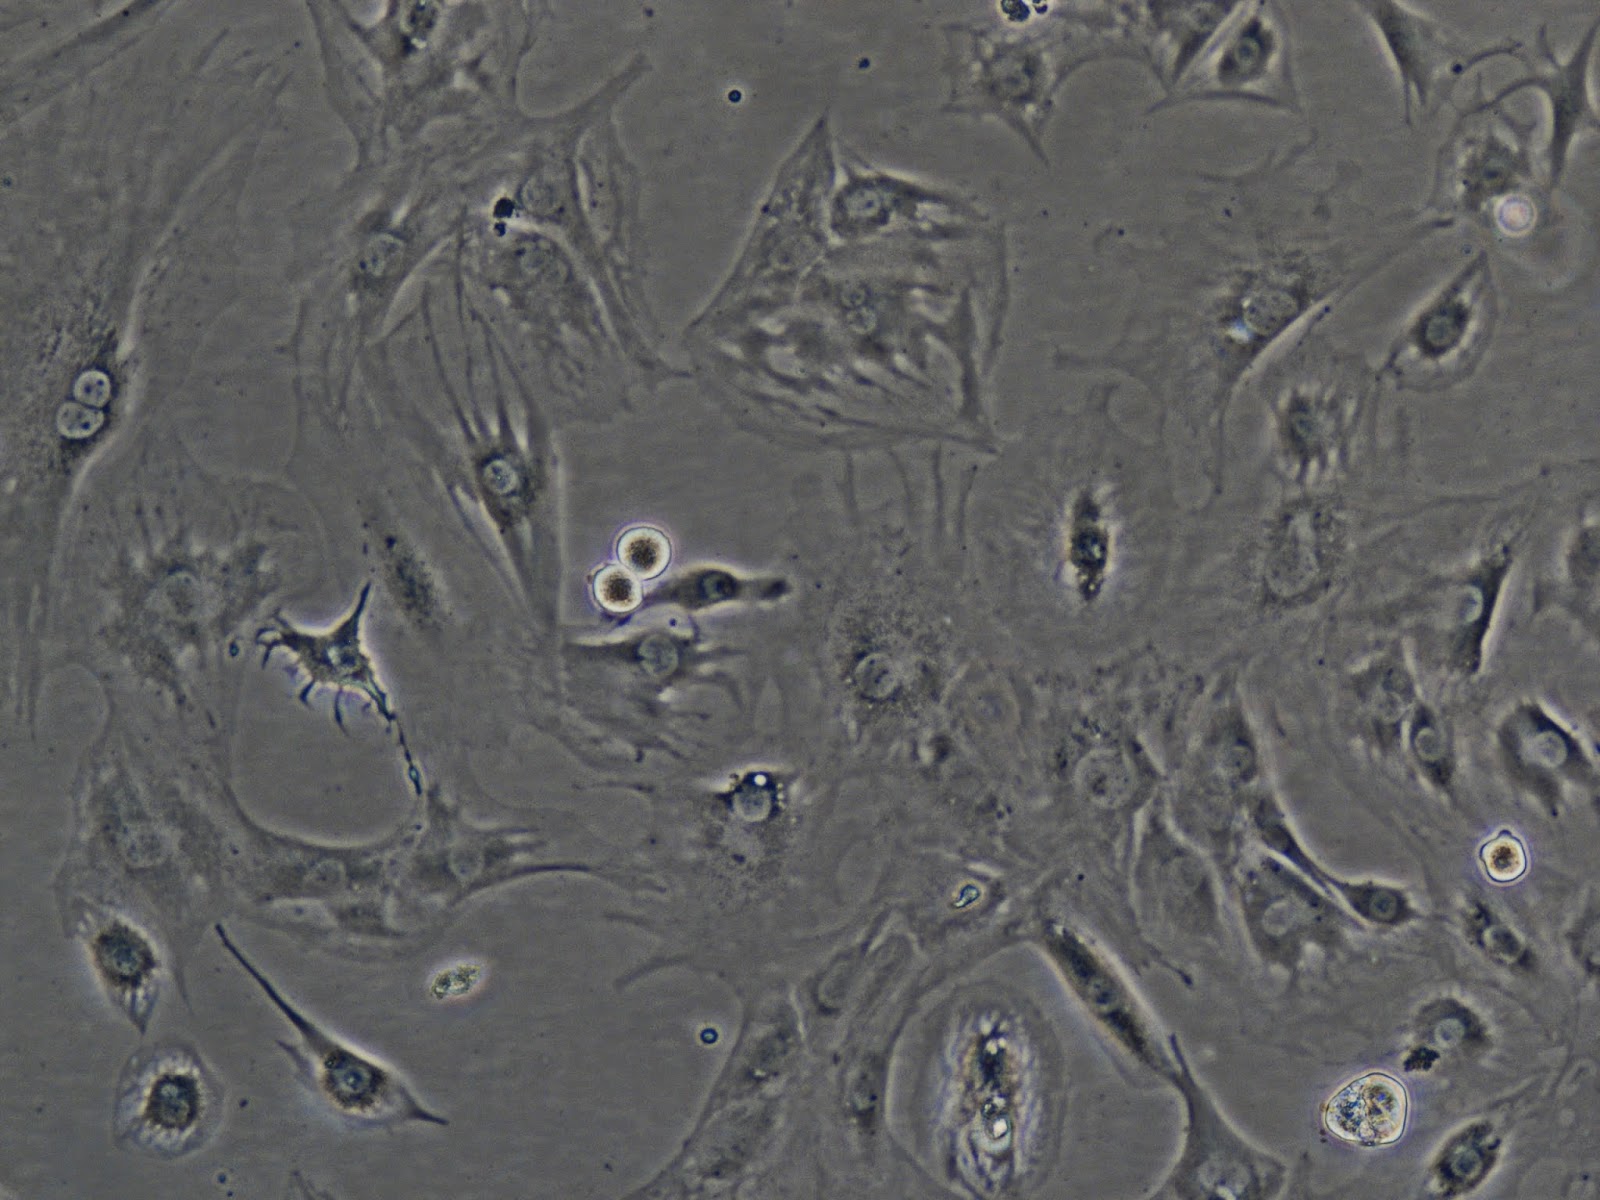
OK, here are my C2C12s now, differentiated into multiple nuclei cells (versus cells with one nuclei) - you can see them form longer, stretched out cells now. You can also see the cytoplasm around some of them. I told my peeps at SymbioticA today that I'm about as good at feeding and maintaining cells (which need to be fed every two days) as I am at watering plants and looking after animals, meaning kind of not really. These guys just got fed after five days. I'll try to do better!
And, my entire assortment of tissue cultures in the incubator at present - that's a lot of hungry cells:

I've been awarded a very generous international artist-in-residence grant from artsnb (the New Brunswick Arts Board). This enabled me to close my crowd funding campaign, because my budget is now at exactly the amount it ideally needed to be for this project. Previous to this, I was coasting on the absolute bare minimum that I needed to be here. What a relief it was to receive word that I was selected for this grant! The New Brunswick Arts Board has been absolutely phenomenal in supporting my art career over the past 13 years, just when I need support the most. We New Brunswick artists are very lucky to have this resource. The things I will be able to do now at SymbioticA will be quite extraordinary.
More good news, too - I have a bone cell! :
This, my friends, is my very first viable bone cell!
ISN'T IT BEAUTIFUL? It looks sort of like a hummingbird. This is from the rat bone marrow that I extracted from the rat that Henry the cat caught for me. Henry, my hero. The cell is the splatted thing on the left. The ghostly-looking splat stuff is the cell's cytoplasm, which has spread out and adhered itself to the bottom of the pitre dish, meaning that this cell is healthy and growing. The luminous thing on the bottom right with the tentacles is likely another cell as well, but it's unclear how healthy it is because only the nucleus is visible and no cytoplasm. So, it may be dying... or maybe it will grow. I'll know in a few days. If you look back to the splat, you can see a similarly sized nucleus in it, a white roundish thing that is underneath another layer of cell stuff. The long tendrils that reach out into the nothingness are the cell's way of networking with other cells, and when they join, the begin to form a colony, which is what I want. It was a joyous day the day I discovered this cell under the microscope! Just imagine me, like a space explorer, searching the empty universe for life, day after day, to one day stumble across this! No small accomplishment, let me tell you. Primary sourcing cells from recently dead tissue is very, very difficult. My other cell cultures are doing nothing and will just have to be thrown out. I've been struggling to work with this technique because I discovered that ordering cell lines from a supplier is much more expensive than I first imagined: the cell lines themselves are around $500-$700, but with the shipping, it's a total expense of about $2000. $2000 for a bunch of frozen cells in a miniscule vial, shipped in a box kept at -80˚. If it continues to grow and multiply, I will eventually be able to spin down and freeze my own vial of osteoblasts, and save them for later or allow someone else at SymbioticA in the future to use them, contributing to the ongoing research there. When I looked at this cell today with my naked eye through the microscope, it was glowing and radiant. A stunning, inspiring communion with the force of life, through just a single cell.
 |
| 3D printed scans of Stelarc's arm with the ear implant. |
So, I'm printing looms for weaving. Each loom is approximately 3cm x 3cm, and I've printed some miniature loom tools as well, like shuttles and needles. The looms so far are different models of simple frame and peg looms, which will allow me to weave basic cloths. I will get more elaborate with printing and assembling looms after I experiment with these ones, perhaps even print a full floor loom model in miniature and assemble it. Why the miniature looms?
My newest research has led me to discover that silk fibre is not only compatible with human biological systems (meaning the body and cells like it, it will break down in the body over time and it's even been used successfully in bone grafts already), but it also carries "indicators" that communicate with bone cells about how to differentiate, meaning it basically has programming for bone cells on each silk filament. What this means is that you don't have to use a special differentiation medium, like bone soup, to grow osteoblasts. The silk will tell them what to do, so you can grow osteoblasts in regular old cell medium. If this isn't the most radical and incredible thing ever, I don't know what is. Mind = blown. I ordered unspun silk filament thread and will weave some into miniature cloths and then will insert the entire loom with the cloth still on it into a pitre dish and culture cells on it. Imagine how amazing this will be! I'm also going to weave some of my decellularized intestine on it, as well as surgical sutures (which, by the way, are either made out of SILK or GUT). I have ample sutures waiting to be used, and will begin prepping my silk yarns tomorrow. I pick up my printed looms from Stelarc on Friday and then start weaving. I also printed some already woven structures, like a woven ball and a basket weave, to try them out in culture dishes as well, to see what happens. I'm not sure if cells will grow on that kind of polymer or not, because it's not organic (so probably not). Ultimately, I'm hoping not, because I want my cells to just grow in the shape of the cloths I weave, not the looms. I will post pics of my miniature looms once I have them. Here are some of the things that Stelarc has printed as experiments for himself:
 | ||
| A 3D printed, functioning miniature bike chain. He gave me this as a gift. |
 |
| A 3D printed, functioning miniature wrench. |
I was also amazed and delighted to discover that preparing silk for a cell culture is exactly the same as prepping it for dyeing: washing in boiling water with soda ash for 1 hour, 2x. The only difference is that I'll dry the silk in a fume hood that's turned on overnight and autoclave it (cook it in extremely high temperature steam) to kill absolutely everything that might possibly contaminate it. Tonight, I am making my own soda ash (or sodium carbonate). I discovered that you can do this by simply putting baking soda (sodium bicarbonate) in the oven at 200˚C for 1 hour. Ta-dah, you have soda ash. It's just fantastic how much of my tissue engineering work is a combination of science, kitchen witchery and textile know-how. This particular aspect of things thrills me.
 |
| My eucalyptus dye, before (left) and after (right) adding mordant. |
 |
| Some of my bone slides being stained. |
 |
| This bloody gash is eucalyptus sap. |
 |
| Macro shot of eucalyptus sap, which looks remarkably like the potassium ferricyanide crystals I was growing, here: http://ossificatorium.wordpress.com/photo-gallery/ |
OK, here are my C2C12s now, differentiated into multiple nuclei cells (versus cells with one nuclei) - you can see them form longer, stretched out cells now. You can also see the cytoplasm around some of them. I told my peeps at SymbioticA today that I'm about as good at feeding and maintaining cells (which need to be fed every two days) as I am at watering plants and looking after animals, meaning kind of not really. These guys just got fed after five days. I'll try to do better!
 |
| Mighty Mouse cells! |
Monday, May 26, 2014
developing a cell vocabulary + cat lab assistants
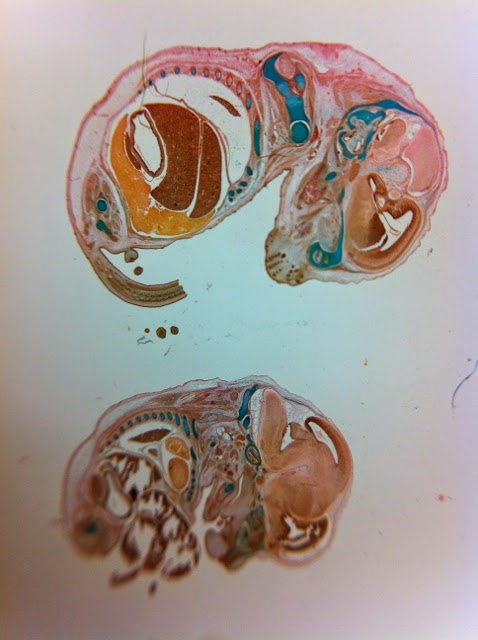 |
| Histological slides of mouse fetuses in the collection at CELLCentral, UWA. |
 |
| Little rat femurs. |
I sent the microscopic digital images I captured on Thursday to an artist collaborator of mine in Montreal, Paloma Dawkins, who is now in the process of drawing and animating them. I'm really excited to see what she'll produce from the images!! Part of the challenge when working within the realm of science and biotechnology is to not just get totally seduced by the technology and lose part of the creativity of the work. So, these little animations are one way to aestheticize the research in a creative manner. Paloma and I worked together last year with great results, so I have every confidence in her. Here are some of the images she's working with and some explanations for what's going on:
 |
| C2C12 (Mighty Mouse) cells. |
 |
| More C2C12s, same dish, different location. |
THESE are the beautiful universes of bone marrow (from a cow femur):
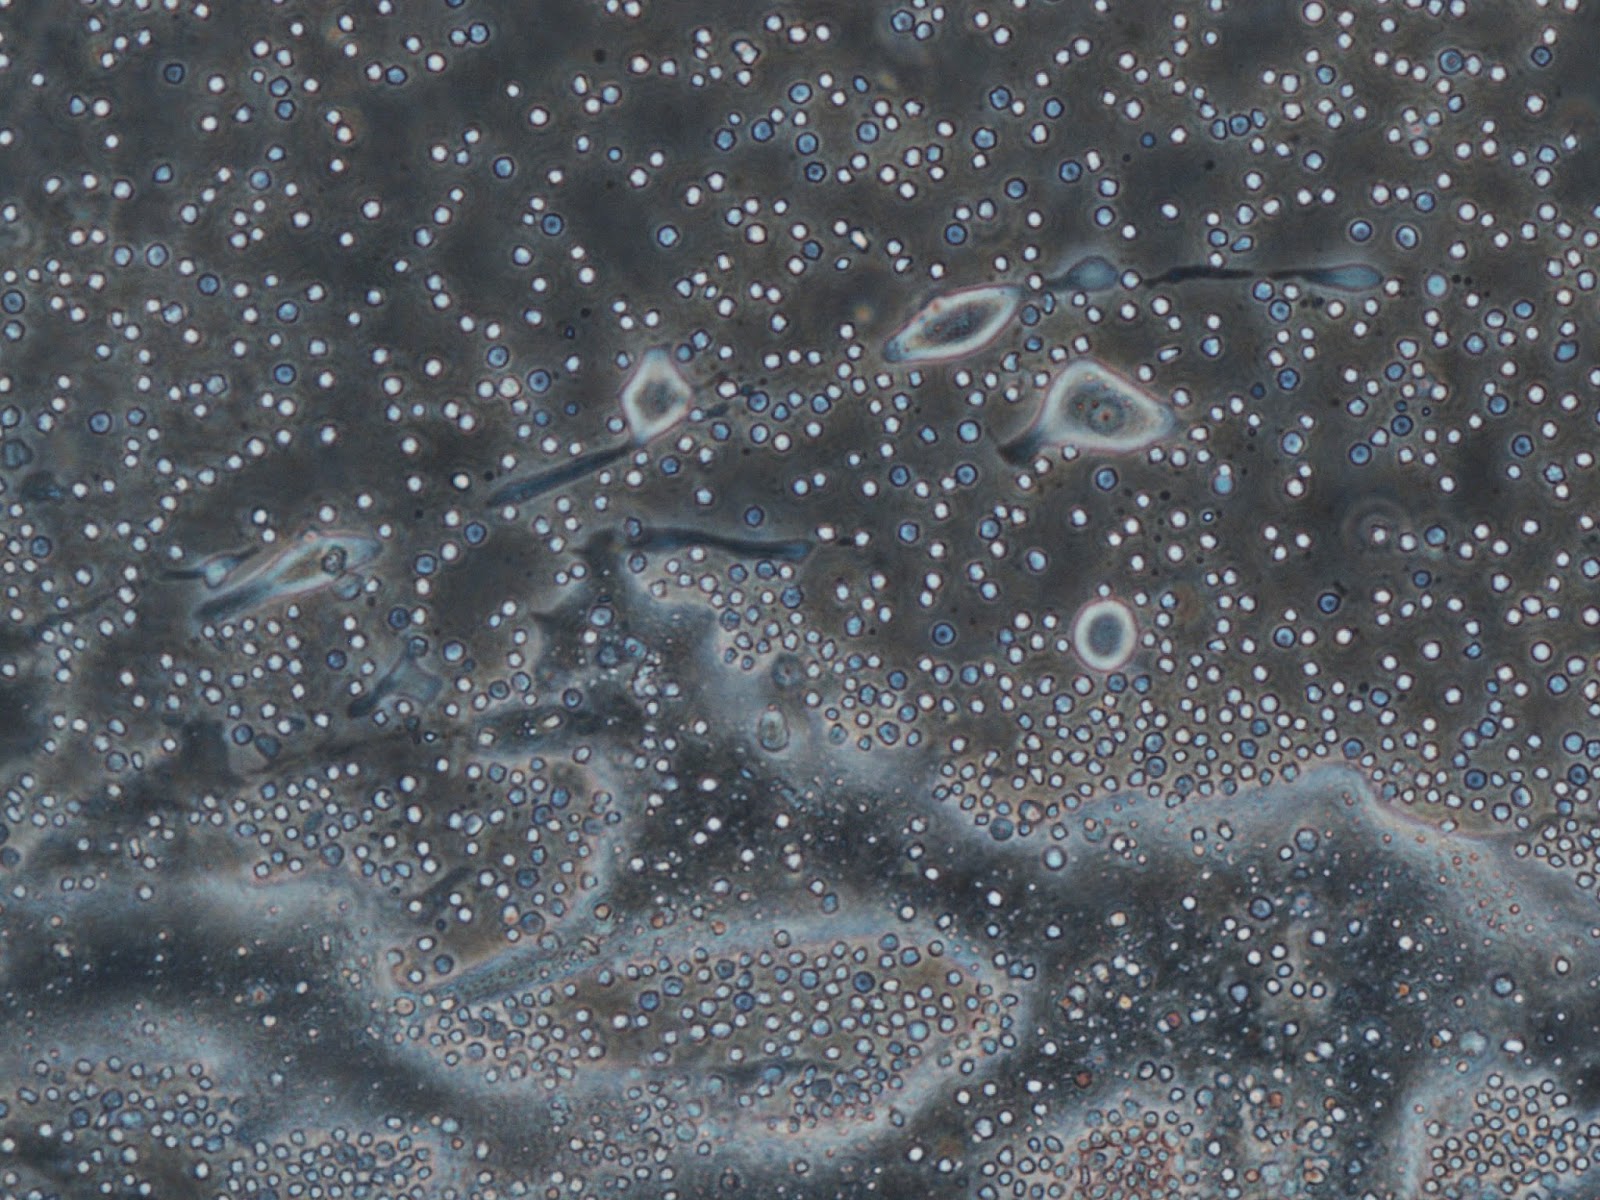 |
| All of the tiny white and blue dots are red blood cells. The white ones are alive, the blue ones are asphyxiating and the ones with black dots in the centre are fully dying. Red blood cells have a short life span and no nucleus. The large cloudy stuff is fat, or oil from burst fat cells. The larger things with auras are what are possibly viable bone cells. Keep your fingers crossed for me. Stuart will look at them this week and tell me what they really are. |


These are the images that Paloma is animating. In this bottom image, you can see nuclei in the cells, which is a good sign (the dark pepper specks inside the cell). This week I'll check the cultures again to see what's still alive. Guaranteed there will be a lot less red blood cells. Will there still be anything else alive? We shall see.
One of my cultures today was full of beautiful growing crystals! This is amazing again because I was growing crystals on hog gut last semester as part of a biomimetic project. All of my lab work is validating everything that I had been working on intuitively before, in my studio/lab. I hope the crystals last long enough for me to photograph them.
Lastly, I began the process of decellularization last week as well, on hog gut. I cut open the intestine, stretched it out into sheets that I pinned down to a styrofoam base and added an enzyme called Trypsin to dissolve all of the cells. It was beautiful. Trypsin is pink, so it coloured the gut until all of the cells were washed away. It's completely white and transparent now. More pics of that later.
 |
Tuesday, May 20, 2014
counting + freezing down, plus the durability of the hog gut matrix
.JPG) |
| Oh, just a cow head in formaldehyde in the lab. No biggie. |
On Friday, I scanned and scanned... aaaaaaand scanned my culture flasks under the imaging microscope, and found ONLY ONE possible viable cell. This was tragic. Guy Ben-Ary trained me in using the very posh digital microscope, and also informed me that cells are social creatures - they like to be able to reach out and touch other cells, make a colony. He said without other like cells around, they will die. There were plenty of red blood cells, in various stages of life and death: bright ones still alive, blue ones in a state of asphyxiation (dying) and dead black ones. Then, one larger round one, a viable cell! Only, it was a poor, lonely cell, looking miserable. Its centre was blackening and it was possibly going to just die. I was crestfallen.
The success is that my cultures have no contamination. This is a big deal. Especially since I'm a noob in the lab. And, especially since I was digging in a messy (non-sterile) bone for these cells. So, I should be happy about that.
Today when I looked again, I saw things that looked potentially exciting. Alas, they were air bubbles. That's what Ionat told me, anyway. Microscopic air bubbles. I then went through a process of removing all of the media (bone soup or DMEM, whatever each flask had) and replacing it with new. The old media (junk media) was stored in new, sterile flasks and returned to the incubator, just in case at some point something unexpected decides to grow. The fresh media in the old flasks was likewise then returned to the incubator on top of the flask with its old media. I looked again through the microscope, hunting for life. Nothing. I will dig out another bone from the butcher tomorrow and try again with new cultures. I might also get to have some bone cancer cells from the freezer if Stuart can find them. Now, THOSE will grow.
Today I began decellularization and freezing down cells. After speaking with a surgeon this weekend about what tissues might have the strongest extracellular matrix (a.k.a. collagen), I now know that pig intestine is my best bet for decellularization. He tells me that pig tissue is by far the strongest, not to mention the closest to human. Also, on top of that, veins, arteries and bowels have the strongest tissue matrix. This is extremely interesting, given that I was doing my preliminary research with hog gut through a biomimetic inquiry into the process of tissue engineering. Somehow I intuitively knew that hog gut was the best material to work with. But, as with so many things in that project, intuition was always the best guide. This is what I consider listening to the haptic intelligence of my body: it tells me things on a subtle level that I can't explain at the time, but that later prove to be scientifically accurate. Anyway, I secured a good amount of hog gut from the butcher and away we went.
The cells that I froze down were half of the C2C12s that I began in my first day at the lab. Cells just keep multiplying, so freezing them down is the only way to keep them to use them, but also stop them from continuing to proliferate.
Here are my new protocols that were put into play today in the lab. Yes, I counted cells. How did I keep track? With a handheld clicker, while I stared through the microscope.
.JPG) |
| Hog gut stretched over sterile vials. Stage I. |
- Wash tissue in ultrapure H2O overnight (in beaker/container) on a rocker @ 4˚C
- Incubate tissue in 0.05% trypsin with EDTA for 30-60 mins @37˚C
- Wash the tissue briefly with ultrapure H2O to remove the trypsin
- Neutralize the trypsin by incubating the tissue in culture media (e.g. DMEM) containing 10% FBS at RT, 2x30 min (can leave O/N at 4˚C)
- Wash the tissue in 1% Triton-X-100 made up in ultrapure H2O for 1-2 days, changing the wash buffer 2x per day
- Wash the tissue in ultrapure H2O for another day
- Standard trypsin-EDTA used to dissociate cells from tissue culture plastic: http://products.invitrogen.com/ivgn/product/25300062
- Timing is flexible - originally the TX-100 wash was done for 5 days and rinsed in H2O for several days at a time, but didn't seem to make much difference
- To check how well the decellularization has worked, check sections with DAPI
.JPG) |
| The unused intestine gets frozen in a tube for later. |
PROTOCOL for Counting cells
- May need to dilute cell suspension
- Prepare the haemocytometer:
- Make sure the slide and cover slip is clean. Use EtOH if necessary.
- Moisten edges of cover slip and apply to grid surface of slide.
- Touch drop of cell suspension (recently stirred) onto edge of cover slip at the surface of the slide.
- Capillarity will draw a volume of cell suspension between slide and cover slip. Do not allow volume to spill into grooves flanking the grid on the slide. The cover slip must be totally covered inside, however.
- Inspect under microscope. If cells are really clumpy, you will need to break up the clumps and restart. Clumps of 3-10 cells are OK as long as you can count them easily. If not, dilute suspension.
- Count the cells in the grid of 25 small squares (each of which is itself divided into 16 smaller squares).
- Count cells that touch only two border lines as being in the grid. Ignore cells on the border of the other two lines.
- Make an average count (use both grids) and note dilution factor.
- The volume of suspension contained between the slide and cover slip within the 25 square grid is 1x10[-4]ml (according to the dimensions of each square and the distance between slide and cover slip).
- Multiply the average number of cells by 1x10[4] and this will give you a cell number/ml of suspension. Take into account any dilution.
- For example, if you count 150 cells in the grid specified, then your cell count is 150x10[4] = 1.5x10[6] cells per ml.
 |
| My C2C12s ready for the sleep of deep freeze. |
- Obtain cell count using trypsinisation.
- Spin or dilute cells to give a count of 1.5 million/ml medium.
- Label vials with cell type, passage number, date, initials, number of cells.
- Add 100µl DMSO to each vial.
- Add equal volume of neat FCS (or NCS depending on cell type) and mix well.
- Add 0.8ml cell suspension per vial and mix well.
- IMMEDIATELY start the freezing process which should be relatively slow by placing vials on dry ice covered with tissue lagging for 1hr then transferring to liquid nitrogen or -80˚ freezer or placing in heavily lagged container directly into -80˚ freezer.
Oh, by Friday I will have microscopic images.
Subscribe to:
Posts (Atom)